Showing posts with label unreal. Show all posts

Thursday, July 14, 2016

Spectra Dump #1

Videos and screens! Check the thread on unreal too! https://forums.unrealengine.com/showthread.php?116371-SPECTRA-3rd-person-action-Sci-Fi-rpg

I've started streaming when I work. Either twitter ( https://twitter.com/Whalebranch ) or follow on twitch to be aware of when it's time. We do fun stuff, had alot of chat interaction today and casual talk which was very fun.

Lore dump and project planning and structuring coming up but here's some visual blocking out goodies (Please note the art will be nice in the end and that this is just a ROUGH block out).
Here's the blockout of the key areas of interest and a bit of the initial flow. 

Upcoming / To do as soon as possible
* Blockout ruined base and come up with a nice little puzzle to activate / fix the antenna and figure out how to actually do it too! ;)
* Write down lore, dialogue and brief and collect it (it's in small notes here and there now).


Monday, May 16, 2016

TCP becomes SPECTRA

So I'm working on and off on a personal project of mine that I've called TCP (The Cool Project) for short. It's basically a personal learning project to learn various facets of game creation, world design/building.

I've also been pushing my drawing as you are probably aware, My goal is to combine these two things every now and again to help develop each other. There will also be a bunch of lore and story to this, Some of it already figured out but not shared.

Anyway, I thought TCP was a pretty boring name and decided to call it Spectra instead. There's a whole bunch of reasons but the main reason is this definition which I think clearly defines what this project is about for me...

"a broad range of varied but related ideas or objects, the individual features of which tend to overlap so as to form a continuous series or sequence:"

Anyway. Text text text. Here's some arts! All of it WIP but please check it. I'll be sharing some updated UE4 goodies soon enough, just need to get some more love into it since I've restructured the area a little and it's currently unlit.

Stay tuned!

Paintover of the exterior outside the hidden base complex. (WIP / Exploratory)


Usable MRE ration, Consumable for health/energy/buff.

Very old test of modules etc.

BONUS; The really really old version where I run around and do stuff. Lots of tutorials used and learnt from here.

Tuesday, December 22, 2015

TCP - 01 - First showing! The reveal on what I'm doing!

Just threw up my first video for my little personal project I'm working on (look below!). I'm currently not really focusing on making it look kickass so everything is pretty much untextured or using debug stuff. Assets tend to be just baked with an AO and some quick color-adjustments.

Stealing the text from my youtube vid and adding some random images from behind the scenes, They're all older than what you see in the video below.


http://www.andrewahlgren
http://whalebranch.blogspot.se/
https://twitter.com/wahlgrenus

Everything is in a pretty rough debug state with lots of placeholder assets from both me, EPIC and other sources. Alot of the gameplay and UI stuff I've used tutorials for In order to get a grasp on how it works (Epic's tutorials have been a real life saver!). I've hacked some other stuff and I'll pretty much keep iterating on everything as I go to learn more.

I hope you can kind of feel what theme and mood I'm going for though.

Please follow me on my blog or here to stay in touch. I also got twitter. All links up top.

Song:  Jin Jies Dream - Battlefield 4 OST
Mountains in the background supplied by my good buddy Magnus Olin.
Some of the sounds come from Freesounds.org, Like the ambient, the hello and the equip sound.

Tools used. Unreal Engine 4, Quixel, Knald,

---------------
TCP IS A HIGHLY AND STRICTLY PERSONAL PROJECT MADE BY ANDRÉ WAHLGREN
THE SOLE INTENT IS TO CREATE A SHORT PLAYABLE GAME DEMO TO LEARN AND
UNDERSTAND OTHER SKILLS RELATED TO GAME DEVELOPMENT BETTER.

MUCH MORE TO COME! INCLUDING A BRIEF, THE STORY, DESIGN OUTLINES, ETC

SO PLEASE FOLLOW THE PROJECT AND STAY IN TOUCH!


Wednesday, July 30, 2014

Render of the Mustang is up!

Finally got around to render the Mustang out and do some last minute tweaks. The video should be 1080p and 60fps but I'm uncertain if youtube currently allows it for regular people. We shall see!


Tuesday, July 15, 2014

The day is here. Final Mustang.

Runtime model in UE4. Will be rendering out a 1080p 60fps shot tomorrow.
Far to late to do it now but yeah. Man. Finally done. Shit...

The car was also featured on the latest unreal engine twitch stream, Wasn't prepared for that at all but appreciated it a ton none the less! :)
They were talking about a new car paint material shader that would come to the engine in the next update. Might update the car then if the quality is better without a ton of rework on my end.

You can see the clip here , http://www.twitch.tv/unrealengine/b/546286999 (15:40 in).


So. Should I make it drivable?


Sunday, July 6, 2014

The Ue4 mustang now in motion!

Some more stuff including the first video.


Friday, July 4, 2014

Mustang UE 4 - Dynamic to Static change.

I was gonna add a movie but I wasn't happy with it so sometime during the weekend I promise!
Enjoy these for the time being!

I went from an all dynamic approach to a static one so there's some tweakage to do but there's some results that are significantly better in my book.


Monday, June 30, 2014

Mustang project in UE4.

Been working quite a bit with getting it into UE4 with cool masks and color tweaking. Still have a few bugs to sort out with various areas but I can feel it reaching the home stretch now.

Need to do.

* Sort out some texturing in interior.
* Fix the gap by the window.
* Tweak presentation and lighting. (and I guess the car shader in general)
* Adjust the final colors and masks for final shot / rendered sequence.
* Slight massage of the edges to get better shading and tighten the gaps.

FOLLOW THE THREAD HERE ON POLYCOUNT 


Thursday, February 3, 2011

Boxi's guide to animated objects in UDK.

How to get an animated mesh into UDK.

THIS IS A WORK IN PROGRESS. I'VE ADDED IT NOW SO PEOPLE CAN LOOK AT IT AND GIVE CRITS AND TRY IT FOR THEMSELVES. WHEN THIS TEXT IS GONE IT'S "DONE".


Part 0 - Intro

With this hopefully simple and easy to follow guide I aim to give you the knowledge needed to get your animated props/objects into UDK. As always there's probably a hundred different ways you can do this, this is my way, it might not be the best or fastest but it's what worked/works for me.

If you want it I've also supplied some files of my own HERE that you can use.

I hate to say it but it has to be done in the current state of the world.
Any alterations or modifications you do to the files I supply doesn't make it yours and you can't use them for anything else than testing stuff out, studying and playing with it (feel free to show stuff off if you want). I've seen to much stuff just stolen and used / sold and I hate it. It's not like it's hard to do a box of your own. :)

Other than that, the files have been virustested and scanned and came up clean on my system.
I don't take responsibility for any potential crazyness that mig ensue though.

The programs and plugins used in this guide are as follows...

Autodesk 3ds Max (Trial and student-versions available. I assume Maya would work aswell but I don't know).
ActorX + More info / Tutorial (Plugin for exporting skeletal meshes and animations to UDK)
Outliner 2.0 - A plugin. Not important but good to have.

Note: This tutorial is not on how to animate, just how to get it into UDK. I know people are interested in the animation-part too so I might make a short guide for that depending on how this one is received. It's pretty easy... after all, I did it! :)

Part 1 - 3Ds max settings.

To make sure that your object and animations will be exported properly to UDK you need to go through a few harmless steps first.

First of all, naming. Every object and dummy/bone/whatever you've used needs a unique name. The proper way is to name it all uniquely like "Bottom_Box", "Top_Box_01", "Top_Box_02", etc but for testing purposes it's fine if you just select the "Rename objects..." function in max (under tools) and rename them all in one go like I did.

See, pretty names all around.
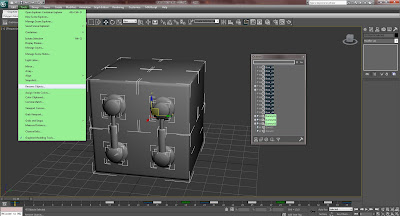
Another important thing to note is that you must group all your objects (and dummies/bones/etc) otherwise the exported mesh might not get all the pivots/bones needed to play the proper animation. See the image below if you don't know where the group option is.

Part 2 - ActorX and it's settings.
(Important, make sure you've installed ActorX.
Instructions can be found in Part 0)

The options and what they mean.
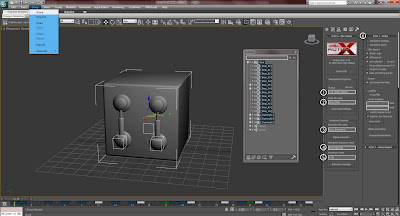
  1. Output - The path you want to save your .PSK in. (Your mesh, for some reason you must click browse and navigate to the correct folder and then click "USE PATH"-button).
  2. Mesh file name - What name your mesh will be saved as in the above directory.
  3. Animation file name - Think of this as the file that contains your animations (more than one).
  4. Animation sequence name - What the particular animation you are exporting at the time is called. In this case the box opens so Boxi_Opening is suitable.
  5. Animation range - In this case the animation is 36 frames long so 0-36 (It starts at 0). So yes, you can have multiple animations in one long go. For example, Boxi_Opening (0-36) Boxi_Exploding (37-55) and Boxi_Dancing (56 to 100).
  6. ActorX setup - What settings you want to use. I generally use these to make sure everything gets exported. For more indepth info go to UDK's ActorX tutorial page.
Part 3 - Exporting & Importing.

Go ahead and set up your settings as you want them. For convenience sake you might want to follow my lead. Anyway, now it's exporting time!
  1. Select your group and click the "Save mesh/refpose"-button. You'll then get a bunch of messages. If the last message you get is "Skin file (meshname).psk written" we're golden!
  2. Click the "Digest Animation"-button and it will save the animation you have set up.
  3. Click the "Animation Manager"-button and you'll get this window...

NOW WE'RE DONE WITH MAX AND IT'S UDK TIME!
(psst, load it up)
  1. I assume people know how to import objects so import your .psk (mesh-file) like you usually import stuff and save it in the folder/package of your choice.
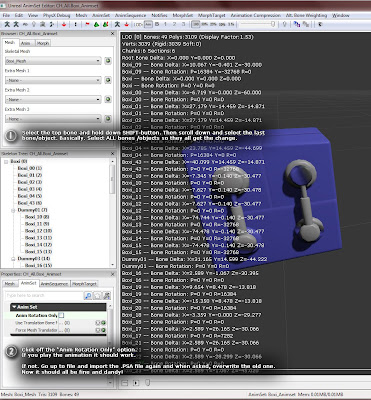
  2. Now right click in your content browser and create a "New Animset" way up at the top. I named mine "Boxi_Animset". Like magic it will have your box inside the animviewer by default. Otherwise just select your mesh in the skeletal mesh dropdown (top left under the menu).
  3. Check the image below on how to import your PSA (animations).
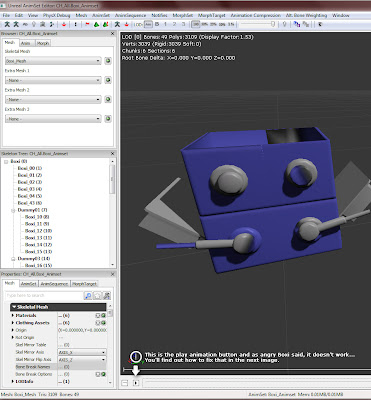
Part 4 - Hooking it all up in UDK.


...and you're done. You have now imported an asset and it's animation.
If you want to preview the animation in the editor and I bet you do, look below.

Part 5 - Bonus - Smart preview trick in editor.
(Courtesy of Paul Mader)

I learnt this trick and much more from the UDK super genius "Paul Mader" that I work with. Drag your skeletal mesh / object into the world. Then go into "unrealkismet".
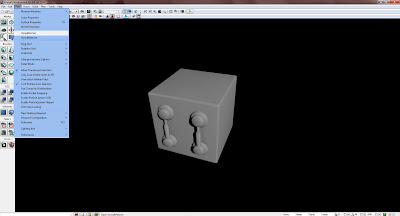
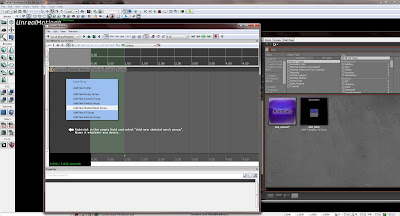
In the kismet window right click in the open space and select "New Matinee". Then doubleclick on the created matinee-node. Inside the node do this...

Now, select the anim-track in the left field and hit ENTER on your keyboard. It will ask your for the "animsequence" (animation). You only have one so hit enter again and voila. You'll see this and be able to play it up.
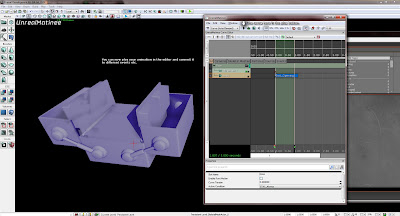

THE END.

In case you have questions, issues etc feel free to contact me either here (preffered so everyone can benefit) or through whatever channel you feel is best. I'll then try to help you out. Maybe it's a problem in my guide, maybe I could explain something better.

Help me help you! I hope you enjoyed the guide and if this one is appreciated I'll do another basic one on how to do the animations themselves (for example how I animated the box) with some cool examples.

Monday, January 24, 2011

Animations in UDK pt. 2

Home sick from work today but felt the need to actually do something. Can't just sit and feel sorry for myself.

So here's an update.


Sunday, January 23, 2011

Animations in UDK.

Playing around with skeletal meshes, exporting psk's and psa's, setting up animations etc in UDK. Pretty fun stuff but yeah it's a bit tricky and finicky at times. Took me a few tries to get this right. It's not really hard it's just that there's a few things you have to keep in mind.

I'm still playing around with the animation and the look of the box hence the crappy pistons. I'm not an animator so this is new territory. Trying to figure out what works and not. I also intend to put up a minor guide once I'm done with it right here.

Monday, January 17, 2011

Kismet this, Kismet that.

So yeah. Lately I've been trying to get better at kismet since it's something that will greatly help any unreal-artist kick out awesome levels and it turns out you can do a whole bunch of wonderfull things in there related to game art aswell.

I can only do the most basic things (game designers do the fancy crazy stuff :)) like trigger effects, move/animate stuff, elevators and such but I'm learning.

Here's one simple thing I did the other day. A door that opens when you walk down the hallway. Nothing fancy. For those wanting to know more about Kismet I can recommend these two pages.