
How to get an animated mesh into UDK.
THIS IS A WORK IN PROGRESS. I'VE ADDED IT NOW SO PEOPLE CAN LOOK AT IT AND GIVE CRITS AND TRY IT FOR THEMSELVES. WHEN THIS TEXT IS GONE IT'S "DONE".
Part 0 - Intro
With this hopefully simple and easy to follow guide I aim to give you the knowledge needed to get your animated props/objects into UDK. As always there's probably a hundred different ways you can do this, this is my way, it might not be the best or fastest but it's what worked/works for me.
If you want it I've also supplied some files of my own HERE that you can use.
I hate to say it but it has to be done in the current state of the world.
Any alterations or modifications you do to the files I supply doesn't make it yours and you can't use them for anything else than testing stuff out, studying and playing with it (feel free to show stuff off if you want). I've seen to much stuff just stolen and used / sold and I hate it. It's not like it's hard to do a box of your own. :)
Other than that, the files have been virustested and scanned and came up clean on my system.
I don't take responsibility for any potential crazyness that mig ensue though.
The programs and plugins used in this guide are as follows...
Autodesk 3ds Max (Trial and student-versions available. I assume Maya would work aswell but I don't know).
ActorX + More info / Tutorial (Plugin for exporting skeletal meshes and animations to UDK)
ActorX + More info / Tutorial (Plugin for exporting skeletal meshes and animations to UDK)
Outliner 2.0 - A plugin. Not important but good to have.
Note: This tutorial is not on how to animate, just how to get it into UDK. I know people are interested in the animation-part too so I might make a short guide for that depending on how this one is received. It's pretty easy... after all, I did it! :)
Part 1 - 3Ds max settings.
To make sure that your object and animations will be exported properly to UDK you need to go through a few harmless steps first.
First of all, naming. Every object and dummy/bone/whatever you've used needs a unique name. The proper way is to name it all uniquely like "Bottom_Box", "Top_Box_01", "Top_Box_02", etc but for testing purposes it's fine if you just select the "Rename objects..." function in max (under tools) and rename them all in one go like I did.
See, pretty names all around.

 Another important thing to note is that you must group all your objects (and dummies/bones/etc) otherwise the exported mesh might not get all the pivots/bones needed to play the proper animation. See the image below if you don't know where the group option is.
Part 2 - ActorX and it's settings.


 Part 4 - Hooking it all up in UDK.

Part 5 - Bonus - Smart preview trick in editor.
(Courtesy of Paul Mader)
(Important, make sure you've installed ActorX.
Instructions can be found in Part 0)
The options and what they mean.

- Output - The path you want to save your .PSK in. (Your mesh, for some reason you must click browse and navigate to the correct folder and then click "USE PATH"-button).
- Mesh file name - What name your mesh will be saved as in the above directory.
- Animation file name - Think of this as the file that contains your animations (more than one).
- Animation sequence name - What the particular animation you are exporting at the time is called. In this case the box opens so Boxi_Opening is suitable.
- Animation range - In this case the animation is 36 frames long so 0-36 (It starts at 0). So yes, you can have multiple animations in one long go. For example, Boxi_Opening (0-36) Boxi_Exploding (37-55) and Boxi_Dancing (56 to 100).
- ActorX setup - What settings you want to use. I generally use these to make sure everything gets exported. For more indepth info go to UDK's ActorX tutorial page.
Part 3 - Exporting & Importing.
Go ahead and set up your settings as you want them. For convenience sake you might want to follow my lead. Anyway, now it's exporting time!
- Select your group and click the "Save mesh/refpose"-button. You'll then get a bunch of messages. If the last message you get is "Skin file (meshname).psk written" we're golden!
- Click the "Digest Animation"-button and it will save the animation you have set up.
- Click the "Animation Manager"-button and you'll get this window...

NOW WE'RE DONE WITH MAX AND IT'S UDK TIME!
(psst, load it up)
- I assume people know how to import objects so import your .psk (mesh-file) like you usually import stuff and save it in the folder/package of your choice.
- Now right click in your content browser and create a "New Animset" way up at the top. I named mine "Boxi_Animset". Like magic it will have your box inside the animviewer by default. Otherwise just select your mesh in the skeletal mesh dropdown (top left under the menu).
- Check the image below on how to import your PSA (animations).


...and you're done. You have now imported an asset and it's animation.
If you want to preview the animation in the editor and I bet you do, look below.
(Courtesy of Paul Mader)
I learnt this trick and much more from the UDK super genius "Paul Mader" that I work with. Drag your skeletal mesh / object into the world. Then go into "unrealkismet".
 In the kismet window right click in the open space and select "New Matinee". Then doubleclick on the created matinee-node. Inside the node do this...

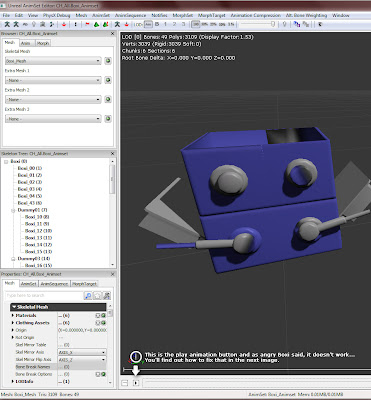
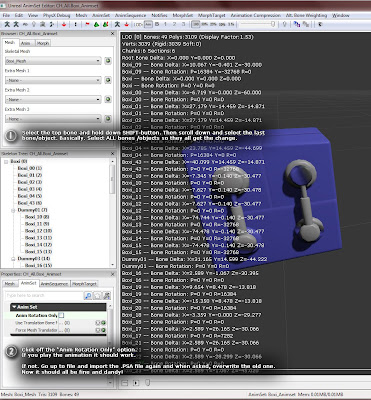
Now, select the anim-track in the left field and hit ENTER on your keyboard. It will ask your for the "animsequence" (animation). You only have one so hit enter again and voila. You'll see this and be able to play it up.

THE END.
In case you have questions, issues etc feel free to contact me either here (preffered so everyone can benefit) or through whatever channel you feel is best. I'll then try to help you out. Maybe it's a problem in my guide, maybe I could explain something better.
Help me help you! I hope you enjoyed the guide and if this one is appreciated I'll do another basic one on how to do the animations themselves (for example how I animated the box) with some cool examples.
6 comments:
This is brilliant! You're a lifesaver, that's for sure. Looking forward for more amazing tutorials!
Very easy to follow and work great, thanks so much for your tutorial :D
Thanks man! :)
Thank you very much!
hey nice tutorial..i was thinking how about if i a building n make a animation that destroys the building..then i want that to import into udk..is it possible...?
Thanks in advance.. :)
Hey, I've done a dummy-based animation and I've been trying to import it to UDK, but some pivots are at the wrong place, although I'd used reset x-form before any skinning.
The case is similar to your boxy animation, would you mind giving me a hand? I don't think it can take much time to fix it!
Contact me at marcvp1988@gmail.com please ;)
Thanks!
Post a Comment